Here’s a complete, step-by-step guide on how to apply for a Moneyview Personal Loan — from eligibility to receiving the money in your bank account. This covers every detail you need to know before you apply.

How to apply Moneyview Personal Loan?
💡 1. What Is a Moneyview Personal Loan?
A Moneyview personal loan is a 100% digital loan you can apply for online or via the Moneyview app without visiting a bank branch. The loan is unsecured (no collateral needed) and designed for various purposes like emergencies, travel, education, or other expenses.
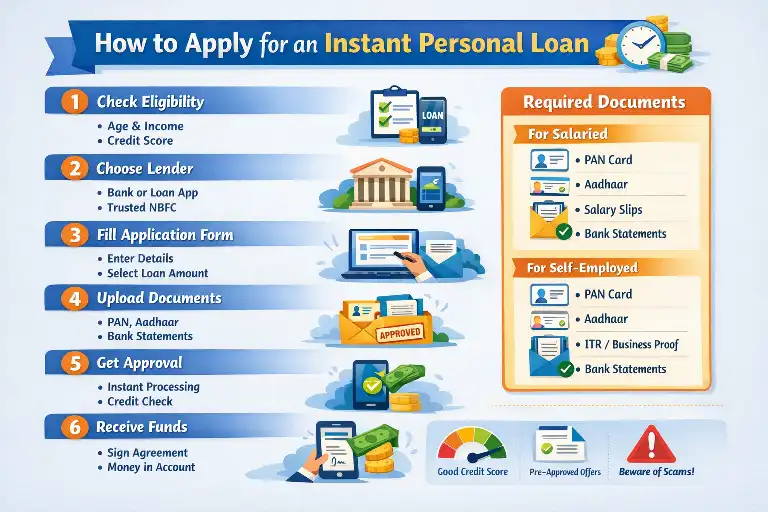
📌 2. Eligibility Criteria
Before applying, you must meet basic eligibility requirements:
✔ Age: 21 to 57 years
✔ Employment: Salaried or self-employed
✔ Income: Minimum monthly income ~₹25,000 (credited to bank account)
✔ Credit Score: Typically minimum CIBIL ~650 (varies by partner)
📱 3. How to Start the Application
You have two ways to begin:
🧑💻 A. Via the Moneyview Website
- Visit the Moneyview personal loan page.
- Click Apply Online or Check Eligibility.
- Enter your mobile number and verify with the OTP you receive.
📲 B. Via the Moneyview App
- Download the Moneyview Loans App from the Play Store or Apple App Store.
- Register with your mobile number and complete basic profile details.
Both options are entirely digital — no physical paperwork required.
🧾 4. Enter Personal & Loan Details
You’ll be asked to provide:
✔ Full Name (as per PAN)
✔ Date of Birth & Gender
✔ PAN Number
✔ Employment Status & Monthly Income
✔ Loan Purpose & Location/PIN code
After submission, Moneyview’s system calculates your eligibility in about 2 minutes.
💰 5. Choose Loan Amount & Tenure
Once eligible, you’ll see your loan offer:
✔ Loan range: typically ₹5,000 – ₹10,00,000 (based on eligibility)
✔ Tenure: usually 3 to 60 months
✔ Interest rate: starts around 14% p.a. (varies by profile)
You can select the amount and repayment period that suits your budget.
📂 6. Upload Documents (100% Online)
Upload digital copies of your documents:
🪪 Identity & Address Proof
- PAN Card (primary)
- If needed: Aadhaar, Passport, Voter ID, Driver’s License, Utility Bills (recent).
📊 Income Proof
- Salaried: Last 3 months of bank statements showing salary credits
- Self-employed: Last 3 months bank statements (sometimes IT returns).
📸 Selfie for Identity Verification
A selfie upload is usually required as part of the KYC process — no physical visit.
🧠 7. Verification & Approval
Once your documents are submitted:
✔ Moneyview (through its lending partners) verifies your KYC and income details.
✔ This verification and approval often happen within a few hours.
✔ You may need to enable auto-debit (NACH) for EMIs.
💳 8. Loan Agreement & Disbursal
After approval:
- You’ll receive the loan agreement with details on amount, interest, tenure, and fees.
- Review and accept the agreement digitally.
- The loan amount is credited to your bank account, often within 24 hours of approval.
💡 9. Repayment & EMIs
✔ Your monthly EMIs are usually deducted via auto-debit (NACH) from your bank account.
✔ If auto-debit isn’t active, you can use the app to pay manually.
📌 Tips to Improve Approval Chances
✅ Ensure your credit score (CIBIL) is good (650+).
✅ Upload clear, valid documents.
✅ Use the same name across PAN, bank, and loan forms.
⚠️ Important Safety Notes
Moneyview works with RBI-registered lenders and NBFC partners, but always:
✔ Apply only through the official app or website
✔ Beware of unofficial calls/messages claiming loans
✔ Never share OTPs or passwords with anyone
If you ever get suspicious communications not from the official Moneyview channels, treat them with caution.